Once you’ve picked a finish and placed an order, the actual installation is a fairly structured process, not the kind of open-ended site work that makes homeowners nervous about timelines and mess. Here’s roughly how it goes.
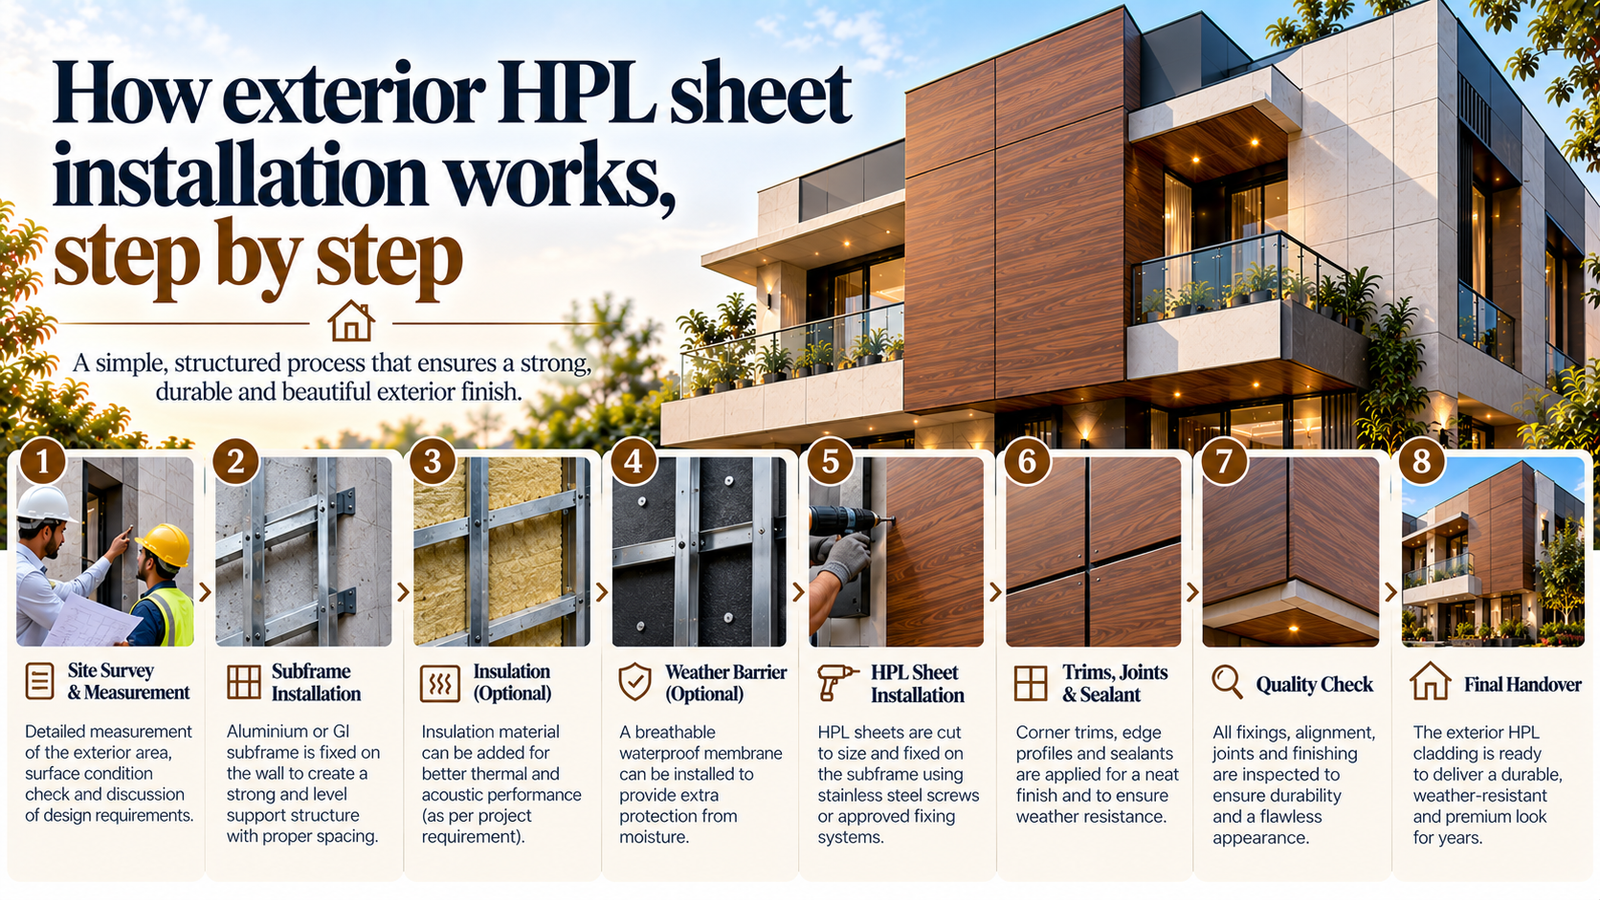
Step 1: site measurement
Before anything is manufactured or cut, a proper site visit takes accurate measurements of every wall face being clad — height, width, window and door openings, corners, and any architectural features that need to be worked around. This measurement is what the actual panel layout and cutting plan gets based on, so it’s worth having someone competent doing it rather than relying purely on drawings that may not match what’s actually built.
Step 2: substructure installation
A frame — typically aluminium or galvanised steel sections — gets fixed to the existing wall first. This frame is what the panels ultimately attach to, and it’s also what creates the ventilated air gap behind the panel that lets any moisture drain rather than sit trapped. This step usually takes longer than people expect relative to the panel fixing itself, because it’s where all the load-bearing and levelling work happens.
Step 3: panel cutting and layout
Panels are cut to size based on the site measurements, with the layout planned to minimise visible seams in awkward places and to keep wood-grain or texture direction consistent across the facade where that matters for the finish chosen.
Step 4: panel fixing
Panels are fixed to the substructure using either a visible mechanical fixing (screws or rivets through the face) or a concealed clip system, depending on what was specified. This is the step that actually transforms the wall visually, and it tends to go faster than the substructure work once it starts, since the frame is already doing the precision work.
Step 5: joint and corner detailing
Joints between panels are sealed with a weather-rated sealant, and corners get a formed profile rather than a raw cut edge butted together. This step is where a lot of the long-term weatherproofing performance actually gets determined, so it’s worth not rushing.
Step 6: final inspection and clean-up
A walkthrough checking joint consistency, panel alignment, and any touch-up needed, followed by site clean-up. This is also the point where the warranty documentation and installation date get formally recorded against your property.
What homeowners should expect during the process
Some noise and activity at the site, scaffolding for multi-storey work, and the usual dust and movement that comes with any exterior construction work. It’s generally less disruptive than a full repaint, since there’s no wet paint smell lingering for days and no need to keep the area sealed off from rain during the process the way a fresh paint job does.
FAQ
Do I need to be present for the site measurement or the installation itself?
Someone should be available for the initial measurement to confirm access and answer questions about the design, but day-to-day installation doesn’t require the homeowner on site constantly.
Is the existing wall damaged during substructure fixing?
Fixing points are drilled into the wall for the frame, similar to any exterior fixing work — this is a normal and expected part of the process, not a sign of anything going wrong.
What happens to debris and offcuts from panel cutting?
Cleared as part of standard site clean-up at project completion, along with any packaging material.
Schedule a site measurement visit to get an accurate installation plan and timeline for your home.